
Robot adoption is increasing in many industries due to global efforts in reducing long term costs, maintaining quality, and freeing up time for humans to do "human" tasks. For example, by using a robot to clean floors or restock shelves in a supermarket, human employees can spend more time helping or selling to their customers. A company can either tap into this robotic trend by buying ready-made robots, or by making their own with less cost.
If engineering resources are limited, selecting the right components can reduce the difficulty and time for building a robot.
In this post, I will briefly go over the steps we took to build a 7-axis robotic arm, some of the things we learned along the way, and a way to do it with less components.
1. Brainstorm - what do you need to accomplish the task at hand?
Brainstorming is the conceptual stage of a machine building process when robot designers decide what type of robot they're going to build, what tasks it needs to perform, and how well it needs to do it. The 1st step can be as simple as a sketch, but details also need to be worked out. For a robotic arm, we needed to determine the number of axes of motion, and the type of components that will meet the requirements. These choices included PNP or NPN output sensors, incremental or absolute encoders, parallel (inline) gearheads or right-angle gearheads, harmonic or planetary gears, or servo motors vs stepper motors.
Designers need to evaluate the pros and cons of each type of component and choose the components that will make the most sense for the intended application. For example, servo motors and stepper motors can perform the same task, but speed, noise , and heat may be deciding factors. However,  has addressed these concerns over the years and should be considered as a servo motor alternative for applications that don't require extremely high speeds. It might be helpful to research how similar robots are designed, and what parts can be fabricated in-house. Don't forget to pay attention to the overall cost of the machine, including labor hours, to keep your boss happy.
2. Design - make sure everything fits and size the motors.
This stage is the time to consider the layout of all necessary components in the robot, and to check all specifications and dimensional drawings to make sure all components are compatible and can fit in the design. 3D CAD drawings are a great way to visualize a design. Choosing a manufacturer that can provide most of the components (and CAD drawings) can help minimize work. A lot of attention typically goes to the bigger components such as motors, drivers, and PLC's, but small components, such as cables or switches, also need room. Remember that heavier components would require a bigger motor to move, so consider material selection for your metal components, such as arm segments.
It's also important to determine at this point that the chosen motors will do the job. Many manufacturers offer motor sizing software to help find the perfect motor for the application. Oriental Motor takes motor sizing seriously. Our engineers are happy to analyze your sizing results so you can get the most out of our products.
3. Bill of Materials - make sure you have everything you need.
Once all necessary components are confirmed, it's time to make a Bill of Materials. Record part numbers, quantities, prices, and lead times clearly to avoid delays from order errors, and save the information to avoid duplication of work.
Verify all part numbers, specifications, dimensions, and lead times before purchasing because one missing letter or number could mean a different product. Once again, try not to forget the little things like mounting brackets and pre-made cables from the manufacturers. These will save you time. Also, consider buying more quantities to avoid delays due to accidental product damage.
|
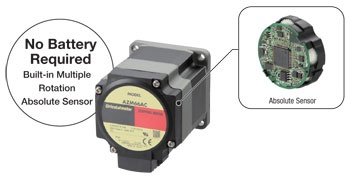
TIP Pay attention to built-in features that can help eliminate extra components. For example, Oriental Motor's AZ Series closed-loop stepper motors include a built-in multi-rotation mechanical absolute encoder, which retains the position data even when the power is off. Therefore, it can eliminate the need for presence sensors, cables, and batteries.
|

Once the purchase order is submitted for the Bill of Materials, we used the time to prepare cable assemblies or fabricate brackets. In my years of troubleshooting experience, while it seems easy, cables are more challenging to make than you think. A poorly made motor cable is often the source of issues and can short out circuits in the driver, so take the time to do it right the first time.
4. Build - one axis at a time from bottom up, or split them up.
Once the components and materials from the BOM are received, the assembly/build process can begin. It's easier to start with the bottom axis and build your way up. One obvious reason is that for multi-axis robotic arms, the bottom axis is usually the heaviest one since it has to carry all other axes and handle moment loads. Once the bottom rotary actuator is installed on a rigid base, you can install each axis one by one modularly and test as you go. Some designers may prefer to assemble and test each axis first before doing a final assembly.
5. Wiring - make sure cables are securely tightened and out of harm's way.
For a robotic arm, organization of cables can avoid potential cable twisting issues, disconnection, or even breakage of connectors. Poorly managed cable systems can also decrease the range of motion for robotic arms. A good cable management practice can be as simple as using cable ties. Another example of is a cable track for linear actuators used on an XYZ stage. Some manufacturers offer standard and flexible type cables. Flexible type cables are designed to be bent repeatedly and offer smaller bendable radius. They are ideal for applications where the cable moves with the motion.
6. Programming - it takes longer than you think.
Many manufacturers use their own software to program their motors. If you do not already know how to program the software, the learning curve could be long. It's recommended to allow more time than expected for programming. Using a universal software or products from the same manufacturer can help shorten the learning curve. There could be many ways to program the same type of motion. Similar to design, simpler is better. Luckily, we were able to use one software to program all drivers. Since the motion data is stored within the drivers, we were able to simplify the PLC/HMI programming.
7. Test, Test, and Test - think of all possible scenarios.
Here's the really fun part. Now that everything is built, assembled, wired, and programmed, we needed to invest a significant amount of time in testing in order to simulate potential scenarios that could pose problems for the robot. This is when we have to put ourselves in our customer's shoes, and think of every possible scenario where issues may happen. For example, what happens if the operator presses these 2 buttons at the same time? (It's human nature. We all know how we like to press buttons.)
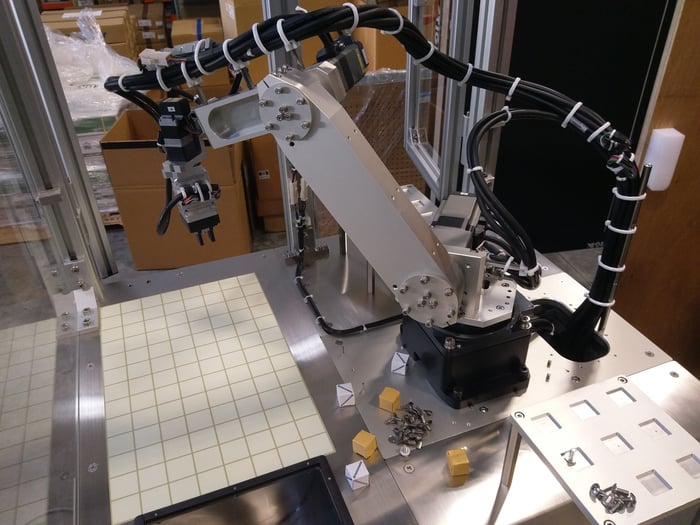
Here's what our 7-axis robotic arm (pick and place robot) looks like. Watch the video below see how it works when it's programmed. We are also working on a new version of the robot with new "mini" drivers. Please stop by our trade show booths in the future to see it in action!
To save time, we used the same series of products for all motion axes. Oriental Motor's  already included a patented built-in multi-rotation mechanical absolute position sensor, so we were able to make the demo pretty quickly without having to spend the time for selecting, installing, wiring and testing any sensors or encoders.
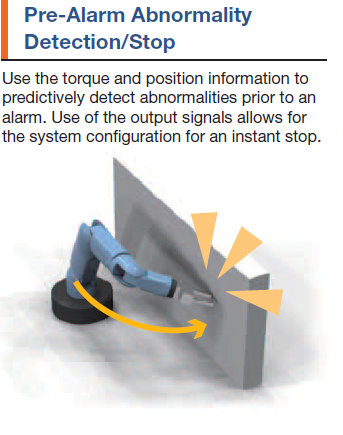
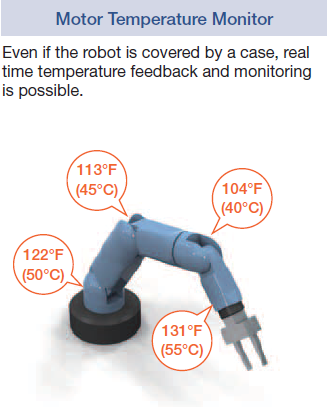
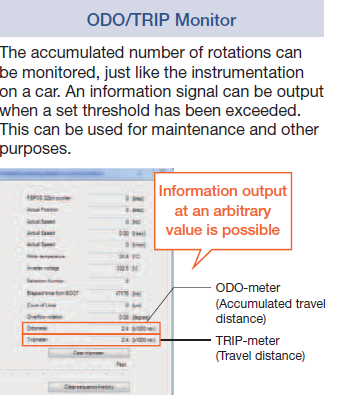
Furthermore, the AZ Series closed-loop stepper motor systems provides advanced built-in functions that can simplify the building of a robot.
 |
 |
 |
We chose a high load hollow rotary actuator for the bottom axis (black portion) that carries the entire arm. Its cross roller bearings are adept at handling high loads, and the hollow portion can be used to feed cables through to the bottom cabinet. From axis 2 to axis 6, we used harmonic gearheads in order to handle increased load inertia, and to eliminate backlash. At the end of the arm, we attached a gripper assembly so it can pick up the little boxes to demonstrate a pick and place function.
Here's the list for the motor components. It really helps that there are many gearing options for the AZ Series, and the same  and
and  are also available on our linear and rotary actuators. There are truly many options to satisfy different requirements.
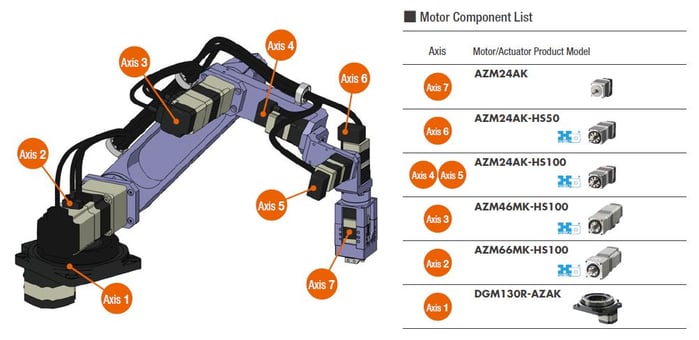
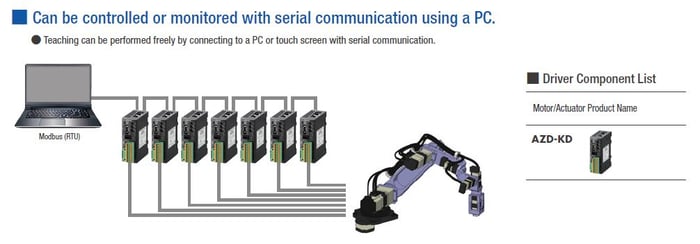
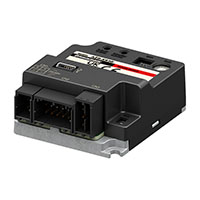
Every AZ Series motor can be connected to a  offering different functions to cover different needs, such as being able to accept a pulse train (or store motion data), being able to power multiple axes, or being able to communicate to a master (HMI, PLC or IPC) via a industrial field bus protocol, such as Ethernet/IP, EtherCAT, or Modbus RTU. Network gateways are also available for other protocols.
The driver component list is shown below. Notice that there is only one part number. Once the motors or actuators are connected with the dedicated cable, the driver automatically identifies the motor's specification and sets parameters such as current, resolution, and internal gear ratio.
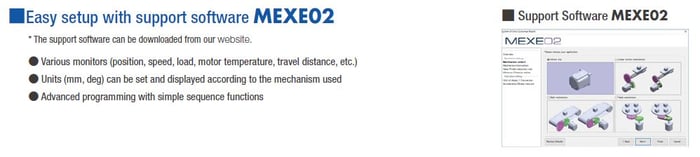
Programming the axes is as easy as it can be. Instead of the traditional line by line programming, the  offers a friendly GUI interface which requires only motion profiles to be programmed (up to 256). Advanced motion linking capabilities allow for looped operation and conditional statements, and remote status monitor functions make predictive maintenance possible.
Congrats for making it to the end of the post. Enjoy the videos!
We built a robot with our standard AZ Series drivers, then we built another version with our mini drivers.
| Robot arm with standard drivers | Robot arm with mini drivers |
 |
 |
All AZ Series motor and actuators feature mechanical absolute encoders, so no batteries are necessary.

| MRC01 Robot Controller and MRC Studio Software: a simpler way to program robots |
|
|


To learn how #AlphaStep can help, request a technical seminar or product demo for your team.