In this blog post, I will explain how to easily program a timed pressing operation with our MEXE02 universal product support software. This example works for any products included in the AlphaStep AZ Series family, which also includes other series that use the same technology and software.
With line-by-line programming, it's helpful to break down the steps that need to happen in a chronological order first. However, the MEXE02 software does not program in a chronological order. It allows the user to program point-to-point motion profiles, and each of these profiles can be linked in a variety of ways.
Let's see what tasks the motor needs to perform in a timed pressing operation. In this example, we use a DRS2 Series compact electric cylinder, which uses the AlphaStep AZ Series technology. Some of the great features of the AlphaStep AZ Series can only be enabled with the MEXE02 support software.
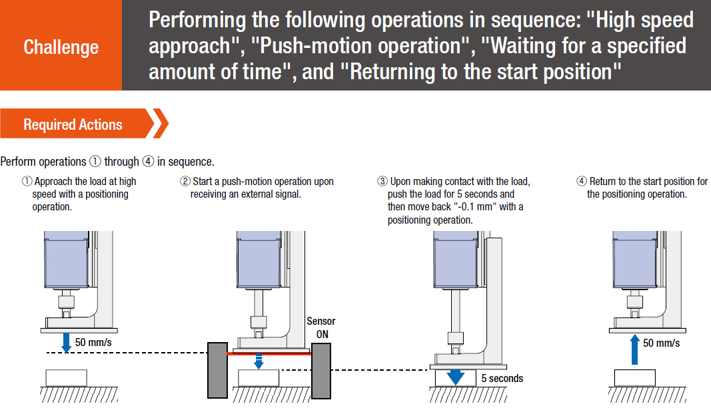
- In #1, it makes much more sense to approach the load at a high speed such as 50 mm/s, then slow down as the load nears to prevent damage. This can be done with a basic positioning operation.
- In #2, once the actuator passes the dotted line, and the sensor triggers, we want the actuator system to switch to a slower, push motion operation in order to provide continuous push force against the load.
- In #3, during the push motion operation, we want the actuator to push against the load for 5 seconds at a lower torque setting, push the load for 5 seconds, then move back -0.1 mm.
- In #4, after the push motion operation, we want the actuator to move back up at 50 mm/s to its original home position so it can be ready for the next load.
OK now that we understand what the motor needs to do, we need to convert plain English to the necessary functions and parameters, so we have an idea of what parameters or data to program in order to achieve the operation. The linking of motion profiles can be tricky, but in many cases, the programming capabilities of the MEXE02 software and our AlphaStep AZ Series products can reduce the burden of the traditional PLC at the very least.
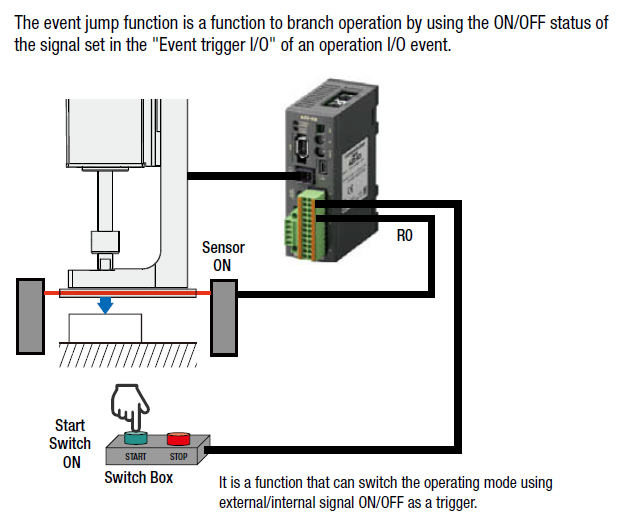
Sometimes, it can help the programmer to visualize the setup. In this example, we use a switch to start the motion sequence. The sensor's output is connected to the driver's R0 input.
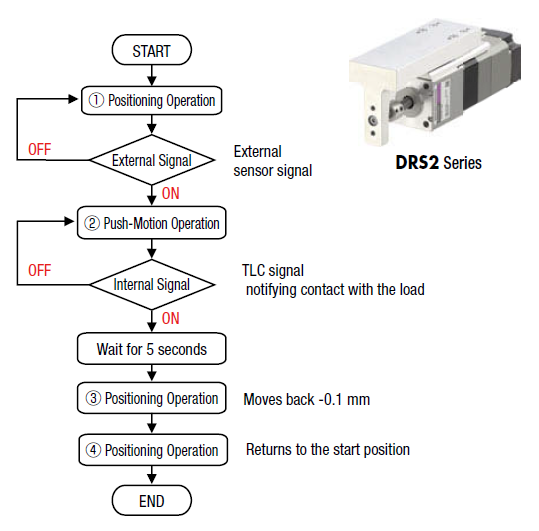
A flow chart helps describe the process. In this flow chart, we also included the actual functions necessary to make this operation happen, such as "positioning operation" and "push motion operation".
The advantage of using a DRS2 Series actuator is that it uses both the AlphaStep hybrid control and absolute positioning capabilities from the AlphaStep AZ Series family of absolute closed-loop stepper motor products. This means the external home sensor, limit sensors, and encoder are no longer needed, which also means less cables and more reliability. Less work is always better, right?

The most difficult part of this motion sequence for the driver to detect an external input signal (provided by the sensor), then jump from one motion profile that's already running, to another motion profile that applies a preset torque %. This can be done by the Event Jump function, but we will also explain the other functions that are necessary to accomplish this operation.
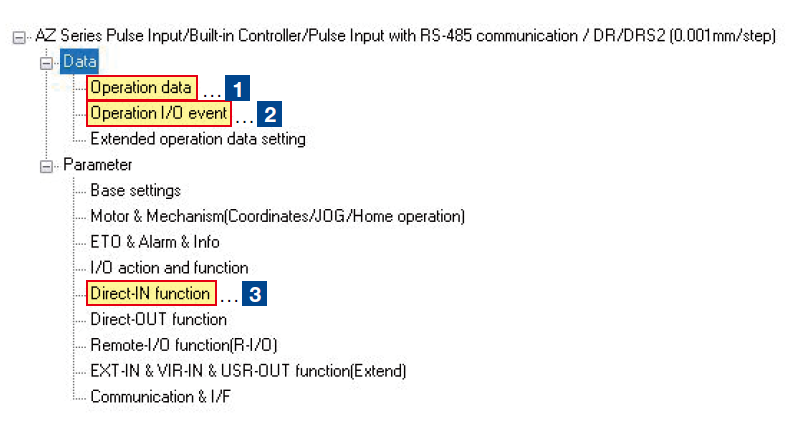
Before we dive into these functions, let's take a look at the MEXE02 software. Below is a screenshot of the software after you have selected a product series. Clicking on the menu items on the left will change the stored data parameters section on the right. The three yellow boxes show the specific functions we need to use.
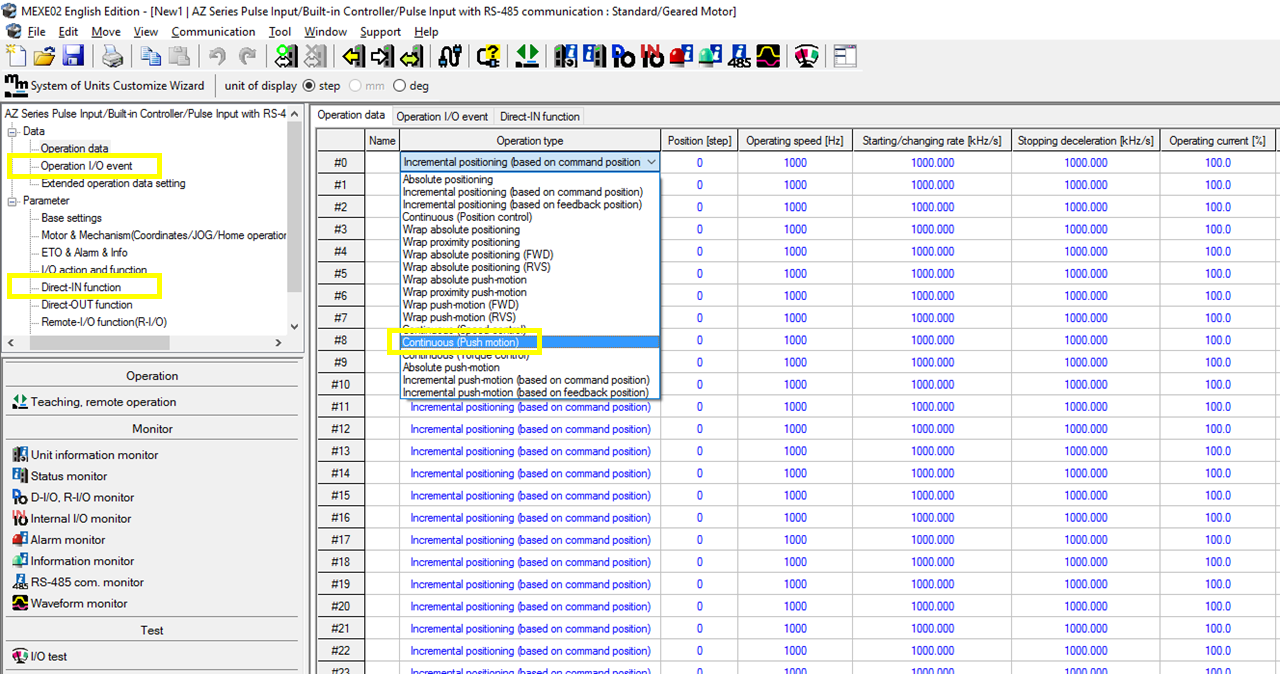
Here we show a close up view of the same image with the 3 functions needed: Operation I/O event , Direct-IN , and Operation type (where you select push motion operation). You'll need to double click the operation type to access its full menu of choices.
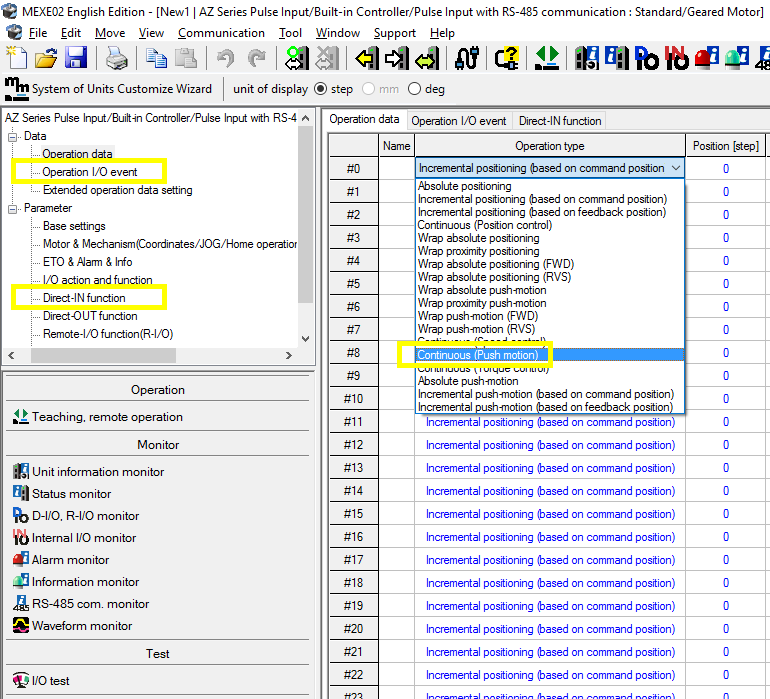
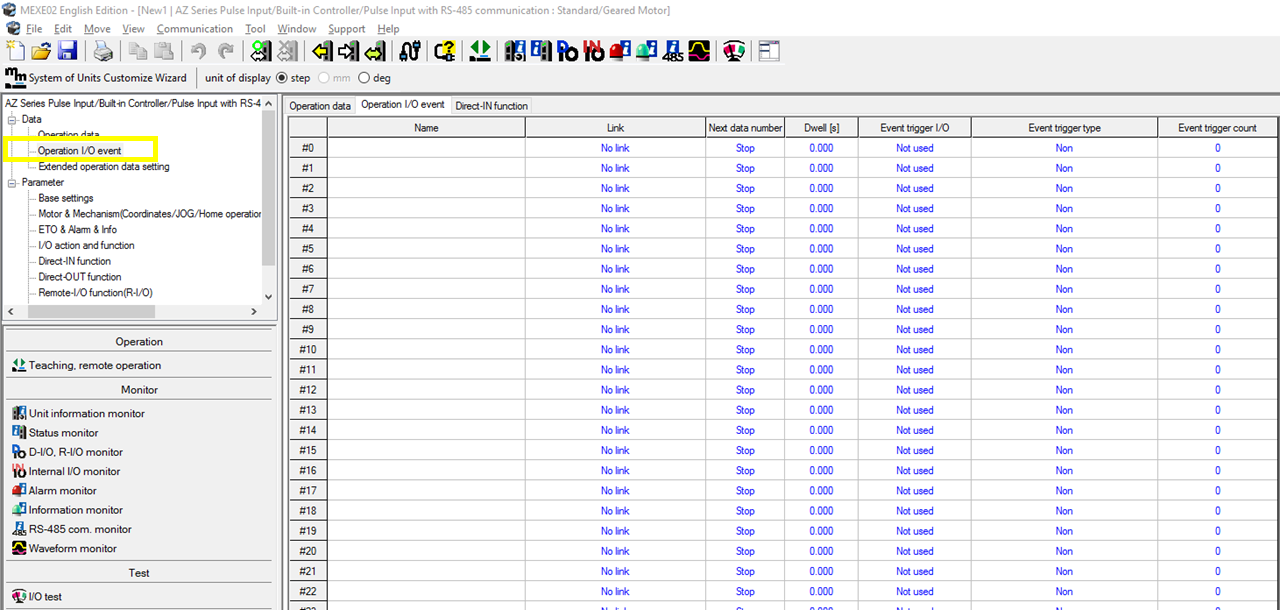
The Event Jump function, or Operation I/O Event, is a function to branch operations by using the ON/OFF status of the signal set in the Event Trigger I/O of an Operation I/O Event. It's a function that can switch the operating mode of a running motor using an external or internal signal as a trigger. For example, the Event Jump function can act as an IF/THEN statement to get the motor out of a looped repetitive motion sequence to perform another task.
Here you can see the parameters you can set with the Operation I/O Event, which includes Name, Link, Next data number, Dwell time, Event trigger I/O, Event trigger type, and Event trigger count.
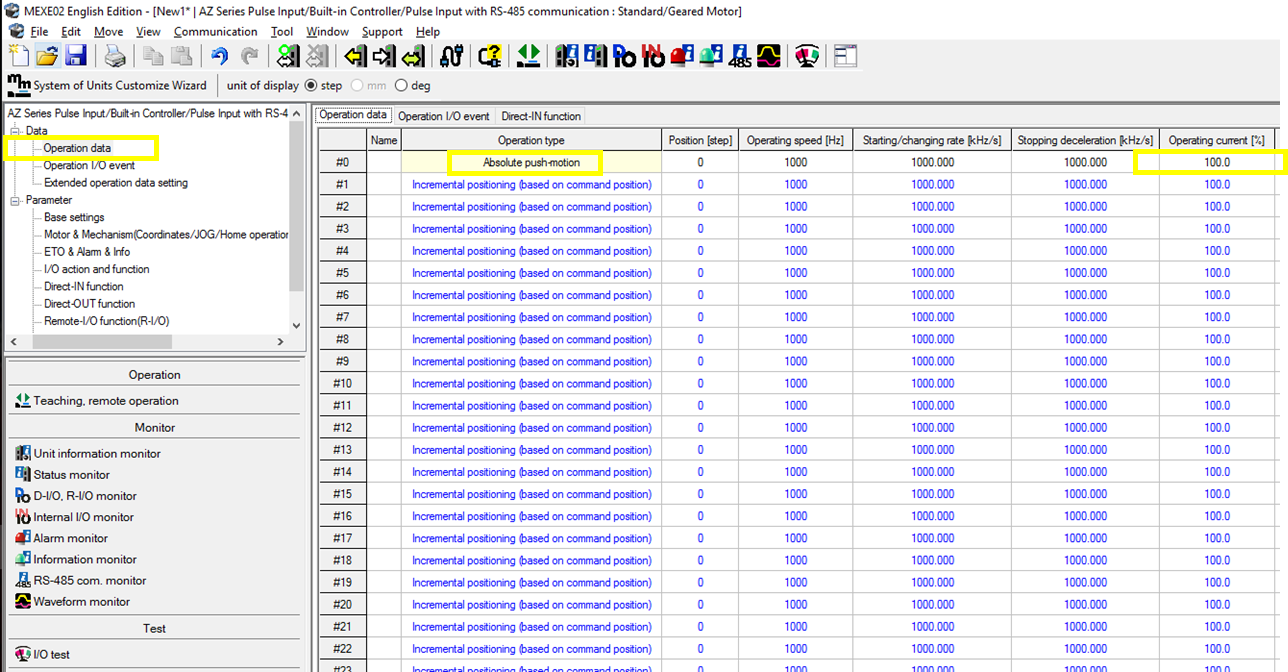
The Push Motion function is a common function included in most closed-loop stepper motor and servo motor systems. It describes a function where a motor intentionally stalls against a load in order to provide a continuous torque or push force. Push motion can be useful in pressing operations, stamping operations, and even measurement operations.
To use push motion, you must select one of the following Operation Types:
- Continuous (push motion)
- Absolute push motion
- Incremental push motion (based on command or feedback position)
Remember to change the Operating current [%]. This controls the torque of the motor. Push motion will not work the Operating current is left at 100%.
The "Direct-IN" function assigns specific external or internal I/O signals to trigger some operation. The driver needs to be told what inputs they should be detecting.

Ready to see the answer? In the image below, we show what the data should looks like within the MEXE02 support software. In the image below, we show the left menu again. The 1, 2, and 3 marks the parameters we need to access.

In the Operating Data window below, 4 motion profiles will need to be programmed (starting from #0). We will need 2 "absolute positioning" profile, 1 "incremental push-motion (based on command position)" profile, and 1 "incremental positioning (based on feedback position)" profile. Remember to set the operating current to 20.0% (torque is proportional to current).
FYI up to 256 motion profile slots are available. For applications requiring more than 256 motion profiles, please ask our technical support engineers for tips.
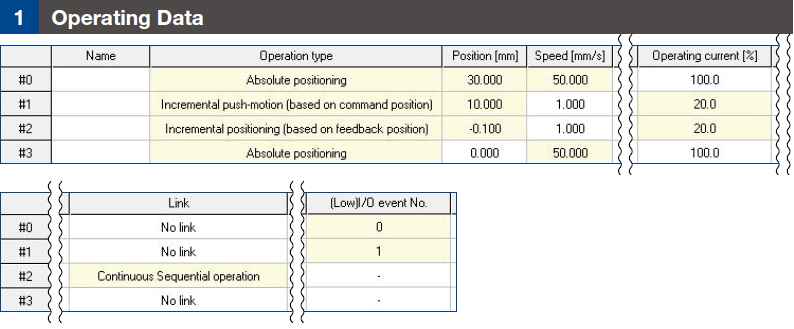
In the Operation I/O Event window, we will need to program #0 and #1 in the following fashion. We will need 1 "continuous sequential operation" and 1 "automatic sequential" operation. Make sure to select the "event trigger I/O", "event trigger type", and "event trigger count". We chose the ON edge for the event trigger type for #0 and ON (msec) for #1. In the event trigger count, 5000 msec = 5 seconds.

In the Direct-IN Function window, we need to set up 2 inputs. We simply need to tell the driver which inputs we want to assign to DIN0 and DIN1. In this case, it's R0_R and TLC.

That's it. It may take a while to get the hang of the MEXE02 software and the variety of methods to link motion profiles. The good news is that this programming example will work for any AlphaStep AZ series family product and MEXE02 software, including the DRS2 Series compact electric cylinders, EZS Series linear slides, EAC Series linear cylinders, L Series rack and pinion, EH Series grippers, and DG2 Series rotary actuators.
Here's a blog post and video introducing the MEXE02 software.
Also: Motion Programming Example: Loop Function For Repeated Motion
Please subscribe for more programming examples!
We don't have a video showing a timed pressing operation or an event jump operation, but here's a video of a round trip operation (back and forth move) + push motion demonstration.
Want to skip the introduction video and dive right into programming?
Here are instructional videos for AZ Series, AR Series, and RKII Series.


